Capital Gameplay

Read at your own discretion.
Capital Gameplay is the second phase of gameplay in Unnamed Space Idle and unlocked after completing the Task List.
After the Task List has been completed, a new ship-class will be made available on the Prestige screen: The Battle Cruiser. It has 6 standard weapon slots, 2 shield slots, and 3 utility slots. Additionally, it features 4 new slot types: 1 capital weapon, shield, and utility slot, as well as 1 hangar (2 after reinforcing 3 times).
Once sector 75 has been reached, a new type of enemy ship will appear at the top of the battlefield. This is the enemy capital ship, and the battle against it will play out completely separate from the traditional enemy ships still swarming the screen. It will periodically charge up its weapon and shoot at the player, draining their capital shields, which are counted separately from standard shields. If either the capital shields or the normal shields fall to 0, the player will be forced to retreat.
Once the enemy capital ships health falls to 0, it will turn red and stop attacking the player for several seconds, after which it will regenerate. The enemy health can be seen at the top-right of the battlefield, alongside several smaller indicators for the ships "Parts". These will get attacked by fighters, and drop advanced resources once broken: Pulverium gets dropped by Turret Power and Torpedo Tubes, Fortifium gets dropped by Defensive Plating, and Adaptium gets dropped by Hangar Bays and Shield Generators.

The battlefield during the Capital phase
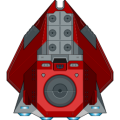
The Battle Cruiser with the default skin


Capital Cores[edit | edit source]
Capital ships feature their own set of weapons, shields, and utility, which work in the same way like their standard counterparts, except that they take advanced resources to upgrade. For a complete list of capital cores, see Core#Capital Cores.
Hangars & Fighters[edit | edit source]
Hangars are a new type of slot unique to capital ships. They will periodically spawn fighters, which circle between the player and the enemy capital ship, attacking it in the process. They can either be set to focus on a specific part of the enemy ship, or cycle between all of them. The enemy capital ship will shoot at the player's fighters, trying to destroy them. Once a fighter's hull reaches 0, it will get destroyed and respawn at the players ship after a few seconds.
[Missing information about stats]
There are currently 2 hangar bays in the game:
-
Fighter Bay
Levels have no effect other than unlocking milestones -
1
Damage Tuning Fighter Damage +17%
Spawn Time Fighter Spawn Time -5
-
2
Hull Enhancement Fighter Durability +45%
Collection Scoops Fighter Efficiency x1.5
-
3
Improved Fighters Fighter Damage +17%
Fighter Durability +10%
Fighter Maneuverability +20% -
4
Thruster Power Fighter Speed x1.1
-
5
Damage Tuning Fighter Damage +17%
Stay On Target Fighter Strafing Speed x0.75
-
6
Improved Fighters Fighter Damage +17%
Fighter Durability +15%
-
Agile Fighter Bay
Levels have no effect other than unlocking milestones -
1
Hull Enhancement Fighter Durability +85%
Advanced Maneuvering Jets Fighter Maneuverability +100%
-
2
Damage Tuning Fighter Damage +35%
-
3
Rapid Approach Fighter Strafing Speed x1.5
Fighter Damage +35%Thruster Power Fighter Speed x1.1
-
4
Improved Fighters Fighter Damage +33%
Fighter Durability +33%
Fighter Maneuverability +50% -
5
Range Extension Fighter Weapon Range x1.2
Stay On Target Fighter Strafing Speed x0.75
-
6
Damage Tuning Fighter Damage +35%
Hull Enhancement Fighter Durability +85%
[Missing information about agile fighters]
Veil Piercer[edit | edit source]
Veil Piercer unlocked by reaching sector 92. It is a new Captial Utility core that does not directly boost a type of stat but instead spawns a new type of non-combat enemy called Veiled Freighter to gain Void Shards at sector 92 or higher. (Veil Piecer is useless under sector 92). When equipped, a bar with appear at the right of the battlefield. Once full, portal will appear which can either be clicked manually or automatically be triggered after a few seconds. In Reinforce 4 or above, they will also drop Specimens.
Upgrading Veil Piercer to level 10 or higher will unlock siphoning, which are timeskips of several seconds to the selected system.
There also have 3 addition stats called Rare Chance, Rare Multiplier and Difficluty Multiplier. Difficulty Multiplier grows with sector, increasing time needed to charge and Siphon Gains each killed. Every time Veil Piercer fully charges there is a chance based on Rare Chance for a Rare Freighter to appear instead of a normal Freighter. Once its defeated, the Siphon Gains will be Multiplied based on Rare Multiplier.
Synth[edit | edit source]
After reaching sector 75 in a capital ship, a new set of Synth recipes will be unlocked, as well as a new set of Synth Point rewards. These work much like the old ones, except that they need advanced resources to craft and often don't get infinite resource production until the next recipe.
Fixtures[edit | edit source]
Fixtures are an addition to the Synth system unlocked upon reaching sector 76. They are intended to provide a use for the system while not actively synthing, and it's therefore best to focus on them when not focusing on Synth. They act like Synth point upgrades that need a certain time to create.
Massive Warp Drive[edit | edit source]
After reaching sector 78, the Warp drive can be upgraded to the Massive Warp Drive.
Upgrading the Massive Warp Drive makes you gain warp essence far more with the much longer charge time, also making you able to jump to loction with Capital Ships and unlocks the second tab of warp upgrades.
Research[edit | edit source]
After Reinforcing once you can unlock Capital Research as one of Base 5's one time upgrades. It works similarly to regular Research but only progresses at sector 75 and higher and requires Data Cores. You start with one Data Core and recieve an additional Core with each sector Boss defeated in S75+. Research Bonuses are applied to Capital Research but it's log'd and Research Focus does not apply.
Specimen Research[edit | edit source]
Reinforcing four times and reaching sector 92 will unlock Specimen Research under Capital Researches. Specimens are only gained by destroying Veil Freighter and the amounts and types dropped are different depending on the sectors in 92 or above. Once at least 1 Data Core has been assigned and Specimens gained, a type of Specimen Research will be progressing each second and Researches under a type of Specimen are working at the same time. Specimen research can be completed multiple times, with every completion increasing amount of research needed for the next.
Overdrives[edit | edit source]
After Reinforcing once then reaching sector 83, reactor can be upgraded to massive reactor.
Upgrading to massive reactor will increase your Max Void Power and no longer require Void Power to maintain 7 power boost (they will sustain at max level), instead you can charge various overdrives for different temporary and permanent boosts.
Reinforcing[edit | edit source]
Reinforcing marks the end of the capital gameplay loop, resetting almost everything and putting the player back to sector 1, after which the capital gameplay phase needs to be reached again. After doing this and reinforcing 5 times, players will proceed to the Fleet gameplay phase.
Battle Ship[edit | edit source]
The Battle Ship is a larger capital ship unlocked at sector 108. It has a new innate bonus making it immune to small scale damage.
The Battle Ship has 2 s. turret slots that can only equip "Plasma Chainer"s. Since it has no s. shield and is unable to equip laser or kinetic weapons, It can not use laser/shield/volley abilities. Defense Efficiency and the respective 3 automator modules are hidden as they are useless.
Battleship can equipp Combat Amplifier that will multiply battle stats, replacing Battle Focus. When a Combat Amplifier is equipped, there will be a bar showing its status. Taking s. damage will drain this bar but it passively regenerates every second. Combat amplifier upgrade effects are multiplied by this bar. You can see the percentage of Combat Amplifiers s. enemies' attacks will drain in Sector Data, replacing their Damage stats.
Capital Resource farming[edit | edit source]
Capital resource farming at capital stage of the game usually realises one algorythm: fastest kill of the highest capital parts you can.
Core idea is to get lower, than your current max sector, to a point, where your fighters, modified for resource farming, will kill all the parts by the moment first enemy capital part respawns. It is always done with basic fighters, because they have more resource efficiency with nodes, which is then modified by all the upgrades you have.
Some things, that you should check you activated before starting the farm:
- Modules, specifically Pulverium, Fortifium and Adaptium beams. Later on you also receive Void Recuperator, Fighter Enchancer and Veil Weakener.
- V-Device, specifically Resource Shard and later Fighter Shard.
- Set Veil Piercer to Resource Siphoning.
- Spliced Crew, specifically Resource Discipline and Resource Enlightement on Spliced Technician.
Compute leveling is slightly dependant on available to you fighter upgrades, but core essence is the same:
- Level Pristine Armor
- In some cases you need to level Speedy Assembly, but that requires observation. If your fighters die somewhat fast, but still are able to kill enemy parts fast enough, you will need it. In most cases, though, it's irrelevant, because core idea is for your fighters to not receive a lot of damage.
- For 3, 4 and 5 you should try to spread point across, as it will give you more modifiers, and mostly better end result. Not leveling the highest levels (which cost more points) is easy way of saving points.
- Level Pulverium, Fortifium and Adaptium Damage Focus.
- Level Pulverium, Fortifium and Adaptium Collector.
- Later on, when you receive them, level Damage Tuning and Hull Enchancement.
- In specific circumstances leveling Resource Tradeoff 1 or more times is advantageous. Those circumstances will be called upon later.
Core for Fighters 1.0:
-
Fighter Bay
Levels have no effect other than unlocking milestones -
1
Damage Tuning Fighter Damage +17%
Spawn Time Fighter Spawn Time -5
-
2
Hull Enhancement Fighter Durability +45%
Collection Scoops Fighter Efficiency x1.5
-
3
Improved Fighters Fighter Damage +17%
Fighter Durability +10%
Fighter Maneuverability +20% -
4
Thruster Power Fighter Speed x1.1
-
5
Damage Tuning Fighter Damage +17%
Stay On Target Fighter Strafing Speed x0.75
-
6
Improved Fighters Fighter Damage +17%
Fighter Durability +15%
Core for Fighters 2.0:
-
Fighter Bay 2.0
Each level grants a percentile damage and durability increase -
5
Target Honing Caps at 10 passes
Fighter Damage Increase Per Pass +0.1 -
10
Hull Enhancement Fighter Durability x1.375
Shield Focus Fighter Shield Ratio x2.5
-
15
Improved Fighters Fighter Damage x1.2
Fighter Durability x1.1Collection Scoop Fighter Efficiency x1.25
-
20
Advanced Target Honing Caps at 10 passes
Fighter Damage Increase Per Pass +0.3Spawn Time Fighter Spawn Time -10
Core for Fighters 3.0:
-
Fighter Bay 3.0
Each level grants a percentile damage and durability increase -
5
Improved Fighters Fighter Damage x1.2
Fighter Durability x1.1Splash Damage Fighter Splash Damage +0.3
Fighter Damage x0.8 -
10
Hull Enhancement Fighter Durability x1.375
Shield Focus Fighter Shield Ratio x2.5
-
15
Collection Scoop Fighter Efficiency x1.25
Priority Damage Fighter High Priority Damage Multiplier x1.2
-
20
Improved Fighters Fighter Damage x1.2
Fighter Durability x1.1Equalizer Fighter Splash Damage +0.6
Fighter Damage x0.5 -
25
Advanced Target Honing Caps at 10 passes
Fighter Damage Increase Per Pass +0.1
Fighter Damage x1.1Advanced Shield Focus Fighter Shield Ratio x2
Fighter Durability x1.15
Core for Agile Fighters 1.0:
-
Agile Fighter Bay
Levels have no effect other than unlocking milestones -
1
Hull Enhancement Fighter Durability +85%
Advanced Maneuvering Jets Fighter Maneuverability +100%
-
2
Damage Tuning Fighter Damage +35%
-
3
Rapid Approach Fighter Strafing Speed x1.5
Fighter Damage +35%Thruster Power Fighter Speed x1.1
-
4
Improved Fighters Fighter Damage +33%
Fighter Durability +33%
Fighter Maneuverability +50% -
5
Range Extension Fighter Weapon Range x1.2
Stay On Target Fighter Strafing Speed x0.75
-
6
Damage Tuning Fighter Damage +35%
Hull Enhancement Fighter Durability +85%
Core for Agile Fighters 2.0:
-
Agile Fighter Bay 2.0
Each level grants a percentile damage and durability increase -
5
Spawn Amount Fighter Spawn Amount +2
-
10
Advanced Maneuvering Jets Fighter Maneuverability +130%
Hull Enhancement Fighter Durability x1.75
-
15
In And Out Fighter Speed x1.1
Fighter Strafing Speed x1.5
Fighter Damage x1.3Collection Scoop Fighter Efficiency x1.25
-
20
Improved Fighters Fighter Damage x1.3
Fighter Durability x1.3Additional Fighter Fighter Spawn Amount +1
Fighter Capacity +1
Core for Agile Fighters 3.0:
-
Agile Fighter Bay 3.0
Each level grants a percentile damage and durability increase -
5
Improved Fighters Fighter Damage x1.2
Priority Damage Fighter High Priority Damage Multiplier x1.5
Fighter Damage x0.9 -
10
Advanced Maneuvering Jets Fighter Maneuverability +130%
Hull Enhancement Fighter Durability x1.75
-
15
Collection Scoop Fighter Efficiency x1.25
Splash Damage Percent Fighter Splash Damage +0.075
-
20
Improved Fighters Fighter Damage x1.2
Fighter Durability x1.2Hyper Focus Fighter High Priority Damage Multiplier x3.5
Fighter Damage x0.5 -
25
In And Out Fighter Speed x1.1
Fighter Strafing Speed x1.5
Fighter Damage x1.3Additional Fighter Fighter Spawn Amount +1
Fighter Capacity +1
In some cases, using top node in 4 (Improved Fighters) can lead to better results, you may test it.
Difference in process, based on available nodes, levels and modules, in order of their appearance:
- Fighter 1.0 are the highest available. With only them, speedy assembly may be quite useful.
- Fighters 2.0 available, node 2 unavailable. Without node 2, Fighters 2.0 essentially function as Fightes 1.0, so speedy assembly may be useful still.
- Fighters 2.0 available, node 2 available. With node 2 Fighters 2.0 can have big shield, and their node 1 adds damage per pass. With that, you ideally want to place at a point, where your fighters can't die while flying - their shield fully recovers before getting hit next pass. After 10 passes, you start to level resource tradeoff slowly, and assessing, if you still can kill all enemy parts fast enough. Speedy assembly is absolutely useless at this point. Dropping 1 sector after leveling resource tradeoff is worse, than staying in same sector with lower tradeoff.
- Fighters 3.0 available, node 5 unavailable. Function the same as fighters 2.0 with node 2 available, but you don't level resource tradeoff more than once, since now you don't have additional damage per pass, and most likely won't be able to negate it.
- Fighters 3.0 available, all nodes available. Function the same as fighters 2.0.
Capital core settings for different sectors[edit | edit source]
This part will go over core settings, and how to set your cores depending on sector. Starting with the easiest one: shields.
Capital shields 2.0 and 3.0 have only one noticeable difference in usage and paths - regen (bottom row) vs bulk (top row). Each sector, where enemy capital has "Support Turret Damage" stat means, that this sector would greatly benefit from setting your first row to bottom, because support turrets fire even when ship is disabled, stopping you from regenerating your shields at all. Using more than one node isn't recommended, because first node regen is enough to sustain support turrets. While fighting the boss, you may manually change shields from bulk to regen and then back, to have more current shield, but that's only relevant in very close battles - most of the time you better off farming a little more stats.
Fighters are chosen based on the enemy anti fighter turrets and their damage and fire rate. For 1.0, agile fighters usually are better for pushing, while for 2.0 and 3.0 basics usually show better results. You change to the other fighter type, only when your current one dies too fast. That's happening in two cases:
- If enemy has anti fighter fire rate of 1 or lower, it usually has high damage. Basic fighters, which have very low dodge chance, usually don't have enough Hull+Shield to withstand that damage. Agile fighters are better in those sectors, because they can dodge the shots, and there's simply more of them, so enemy shots are wasted.
- If enemy has anti fighter fire rate of 2 or higher, or special text "Missile evasion doesn't work", it usually has low damage. Agiles will be either completely useless, or met with a lot of incoming fire, where their dodge chance doesn't matter. Basic fighters are better in those sectors, because they can withstand a lot of small hits much better.
- If enemy has anti-fighter rate in-between 1 and 2, just follow the rule of "if your primary fighters die too fast, switch to other type".
Capital weapons have top and bottom rows, which are absolutely identical. First two choices in bottom row are concentrated on scaling damage, while top row is concentrated on consistent damage. Reliability is better than exploitation up to 50% of enemy health, and then exploitation starts to work better. For capital laser, bottom row in last node is for oneshotting (and it's called One-Shot mode for that reason), while top row is for every other situation. For burst laser, bottom row is for even more scaling, and top row is for consistent damage.
On burst lasers, if you can't kill enemy in 2 bursts, scaling damage (going all bottom choices except for exploitation/reliability) is better. On capital lasers, if you can't kill enemy in 5 shots, scaling damage (first 2 bottom choices, last choice top) is better.
Amps: Until you open Tuning Amp, you switch between Basic Firepower Amp and Point Defense Amp.
- If enemy has torpedoes, use Point Defense Amp.
- If enemy doesn't have torpedoes, use Basic Firepower Amp.
When you open Tuning Amp, you will use it basically always, and add to it another Amp by the previously defined rule of enemy having torpedoes. The most important parts of Tuning amp are first and third choice. Third choice is the same Retaliation/Exploitation we already discussed in Capital weapons part. First choice is more important, and will be discussed in details later. It should be noted, that for capital laser, additional burst allows it to scale faster, than additional scaling, while it's the other way around for burst cannons. This is because Capital laser already has a lot of scaling, while Burst laser already has a lot of bursts.
Plasma chainers for Battleship: usually do not impact your ability to push a lot. Burst and fire rate are good against torpedoes and big barriered enemies. Chaining and fire rate are good against a lot of small enemies.
Utility cores do not impact your capital combat, with one exception. Eventually, when you open Powercells in Reactor, if you can activate first temporary Cell with it, you can use Overdrive booster for small boost to capital stats. This is a niche case though, and won't be considered.
So, what about core usage? Early on you don't have much of a choice. Then some things open up:
- You change your Basic/Point Defense amp and fighters depending on enemy by the logic described above. PD amp against torpedoes, Basic when enemy don't have them. Basic fighters if enemy has anti fighter fire rate of 2 or higher (or for some reason they can withstand damage of enemy anti fighter easily, which usually means you're in lower sector or your fighters overleveled), Agile fighters if enemy has anti fighter fire rate of 1 or lower.
- Burst laser is opened. From this point on, you will use burst laser (1 and later 2) until Sector 123.
- Weapons and shields tier 2 are opened. You should be able to afford first 10 levels (until milestone) immediately, so change to them. If not - farm more capital resources.
- Sector 123 is met. This is first sector, where you will need to start actually changing your weapon setup depending on your enemy (and later also Tuning Amp setup).
- Weapons and shields tier 3 are opened. You should be able to afford first 10 levels (until milestone) immediately, so change to them. If not - farm more capital resources.
So, how do we choose settings at sector 123 and higher? This sector introduces to use Reactive Armor, which has damage reduction based on the number of times it was hit. It slowly decays, and it decays faster when reactive armor part on enemy capital is destroyed. A few sectors earlier we already met Barrier enemies, that need to be hit a certain number of bursts to break the barrier. Combination of those two leads us to following choices:
- If enemy has reactive armor, and barrier of 3 or lower, use 2 capital lasers with scaling setup. Tuning Amp first setting depends on how big enemy reactive armor is and how many barriers they have. If they have exactly 1 barrier, and high reactive armor - use bottom row in first choice, Scaling Augment. In all other cases Burst Augment should be better.
- If enemy has barrier of 4 or higher, use 2 burst lasers. If they don't have reactive armor, get maximum amount of bursts on the laser itself. Tuning amp should be set to Scaling, if you don't need more burst shots (enemy has Barrier lower than 10), and to Burst, if you need (enemy has Barrier of 10 or more). If they have reactive armor, get just enough bursts to break through the barrier (so if enemy has barrier of 4 or 5, you don't need any additional Burst at all).
This is not 100% optimized list. Some enemies have so low reactive armor, that getting more burst will be beneficial against them. When enemy has specifically 4 barriers, you may be inclined to use Capital+Burst lasers in tandem. This core settings part was made with simplicity of choices in mind.
| Unnamed Space Idle Wiki | |
|---|---|
| Systems | Core • Compute • Synth • V-Device • Prestige • Reactor • Research • Bases • Challenges • Warp Drive • Crew • Task List • Reinforce • Fleet |
| General | Resources • AI • Enemies • Secret Codes |
| Progression | Achievements • Unlocks • Sectors • Offline Progress |
| Gameplay | Standard • Capital • Fleet |
| Events | Spacemas • Spaceversary |
| Guides | All Guides • Beginner Tips • Ship Configuration • Core Computing • Synth Purity • Power Hungry • Base Carry • Galaxies • Useful Tools |
| Internal | Icons |